| Heads up! | |
|---|---|
| This page a work in progress. Feel free to help out by clicking any of the the "Edit" links! | |
About the Game[]
千年戦争アイギス (Sennen Sensou Aigis, Millennium War Aigis) is a Japanese browser-based tower defense game with RPG elements. There are 3 different versions of Aigis, outlined below:
Aigis[]
The all-ages edition of the game. Upon reaching the affection thresholds outlined in Bonding, a dialogue with the character is played. Certain characters and events are exclusive to this version.
Aigis R[]
The R-18/Adult edition of the game. Upon reaching the affection thresholds outlined in Bonding with female characters, an erotic scene is played.
- The above are the 2 main versions of the game. Note that they share the same save data, and players can switch between the 2 freely with no repercussions. In addition, the Android apps are essentially ports of these 2 versions, and also share the same save data.
Aigis A[]
The iOS and Google Play editions of the game. In addition to being all-ages, certain character CGs have been edited to be less risque.
- Note that although Aigis A also shares a save with the other versions of the game, it does not share an SC stock. The A version SCs are red, and cannot be used in tandem with the other versions' SCs (however, since all other data is shared, refilling charisma/stamina or using the shrine in one version will yield results in the other).
- SC in the gift box will be locked to whatever version (Aigis & Aigis R or Aigis A) you withdraw it with.
Maintenance[]
Maintenance, unless otherwise stated, occurs every Thursday at 11AM JST. It lasts for 4 hours, ending at 3PM JST (barring any unforseen extensions, which are rare).
Getting Started[]
To begin, choose a version of the game to work with from the list above (but remember, they do share a save file, so they can be freely switched between at any time). Follow the instructions for that version in Registration and Installation Guide to obtain an account and a copy of the game. After going through the introductory sequences, you should find yourself in a mission.
Gameplay Basics[]
The primary objectives of a mission (with some exceptions) are as follows:
- Clear the mission (with at least 1 life remaining)
- Defeat all enemies
- Do not allow a single allied unit to be killed
Each of these objectives completed grants a star, up to a maximum of 3. If all 3 are obtained, the player is granted a one-time reward, typically a Sacred Crystal (the premium currency of the game).
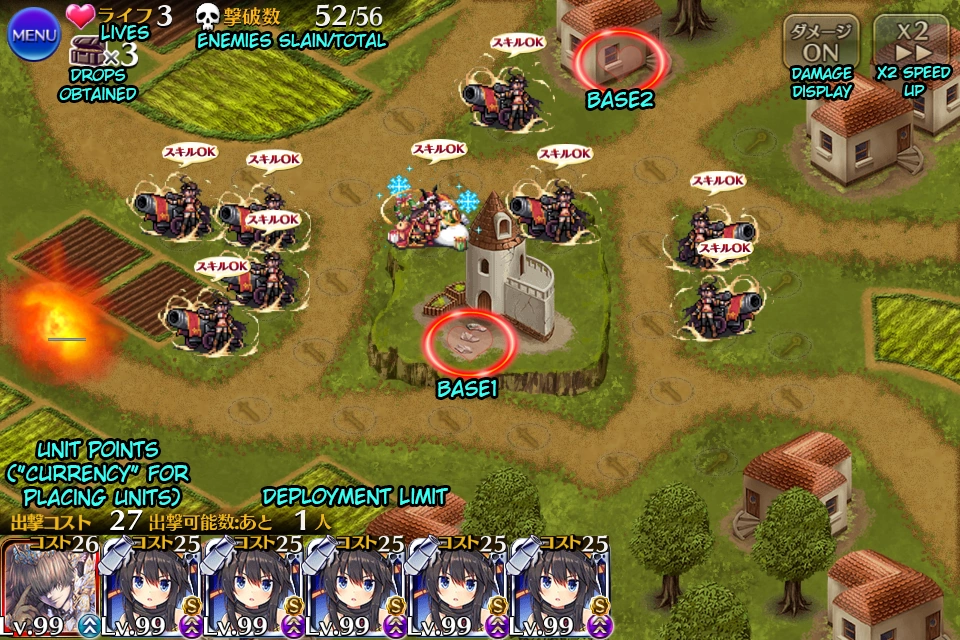
This is an example of a typical mission. The hearts (Base1, Base2) are the monsters' goal - if they manage to get past them, the player loses a life. Missions can have anywhere from 1-4 such points.
To deploy units, players consume a resource known here as Unit Points, or UP (in japanese, 出撃コスト, sortie/deployment cost), which is generated over time (it can also be generated by certain units). Allied unit placement takes 2 forms - melee (denoted by the faded swords in circles, on the lightly-colored road) and ranged (denoted by the faded staves in circles, on the darker colored sections). Be aware that the naming only refers to the placement, not the function; melee-slot units can have ranged attacks. Each map also has a deployment limit, which caps the number of simultaneously deployable units.

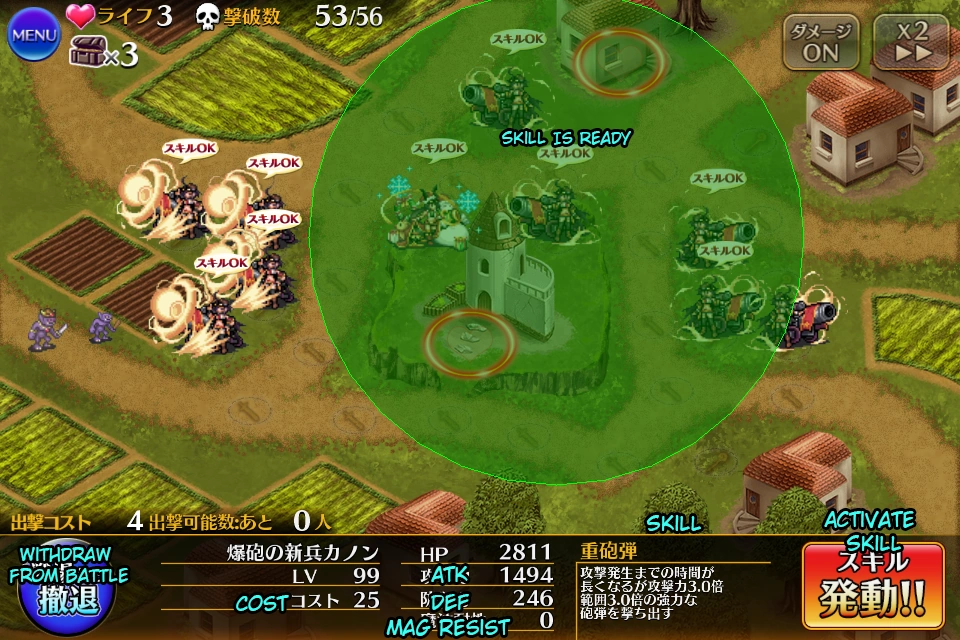
Upon selecting a deployed unit, players can view the unit's stats and effective range (indicated by the green circle), withdraw the unit (removes it from the field and refunds a portion (50% base) of the UP cost), or activate the unit's skill. Withdrawal allows players to prevent the loss of a star by removing a unit from a dangerous situation, among other things (use the refunded UP toward another unit, replace an unnecessary unit, etc).
[]
- Due to the nature of events being the main source of new content, the comments section at the bottom of Event Missions serves as a sort of main chatroom for the users here. Feel free to ask questions and discuss.
- To find a brief summary of the latest updates and current events, go to the front page and scroll down.
- For more details on the various aspects of the game, see the various player-made Guides.
- Due to the nature of Japanese, many characters will have multiple possibilites for romanized naming, which complicates searching. It may behoove you to use a comprehensive list (with pictures) such as Unit Overview.
- When in doubt, try using the search bar at the top of the page.
Intitial Goals[]
If you've completed the tutorial and are unsure of how to proceed, here are some things to work towards:
Progress in the Story[]
There are certain Story Missions that are especially lucrative for repeated runs, and others that are incredibly difficult by comparison and will serve as a wall of sorts for players. Respectively reaching and passing these points should be a goal for new players.
Create a Core Team[]
In this case, core refers to a set of basic units that can handle most situations. This is covered in detail in Team Unit Composition.
Events and Daily Missions[]
Daily Missions are, as the name implies, missions that are available daily in a set rotation. These missions provide a large amount of a specific resource, and being able to complete the more difficult ones is quite important to ensure continual progression. Each Daily provides a different challenge and will have different requirements, outlined on the page.
Events, meanwhile, serve as the bulk of new content for the game. They are generally not catered to new players, so one will have to quickly amass a good team and try to make progress in the events in order to obtain the various available rewards.
Assorted Advice[]
In addition to the resources above, here is a selection of various tips catered to new players, and gathered by various players. Some of the information is especially important to ensure that the player does not make any fatal mistakes, so do read it over before getting too far into the game.
| Readme |
|---|
|
While the game mechanics are overall easy to understand, there is still some knowledge that every starting player should know before making irreversible choices that may affect their enjoyment of the game. This page will strive to be a collection of tips from veteran players, most of which are not listed in the [How to Play] tab below the game screen. [1] In the early stages of the game Silver Units should never be used as fodder when combining Silver Units are essential for Class Change and should thus be conserved. Do not follow the in-game tips that urge you to do Cost Reduce (CR) and Skill Upgrade (SU) - players should only consider doing so after they have already CCed much of their team and have an excess of silver units. Silver units can only be obtained once from every Story Map as a completion bonus. Later on they can be obtained in two ways: (A) They may drop from exclusive Event Missions but with a rather low drop rate and the missions require fairly good units and (B) They can be summoned via the Shrine. The Premium and Rare summon will require Sacred Crystals (SC) which are very valuable, and the Base summon which consume gold gives you on average one random Silver Unit for every 90,000 gold spent. However, new players most likely won't have much of said resources unless they purchase SC. [2] Do not CC your units before they have reached their max level You can CC your Silver, Gold, Platinum and Black units from Level 30 onward but this is not wise since their max level before CC is 50. Thus if you CC them at 30 instead of 50, they will lose 20 levels worth of stats permanently, this can severely damage the potential of your army. After you CC a unit it will revert to Level 1 while still keeping all the stats they earned prior to CC. A new level max supersedes the pre-CC max level, which for silver units is Level 50 and even higher for units above silver. [3] Plan ahead on which units to CC Planning ahead is essential from the start since missions will get more difficult as you progress through the game. Below is a list of some units that you will want to CC first before considering others while still following tip #2. Soldiers like Katie or Phyllis have the ability Call for Reinforcements which add Unit Points (UP) to your total by activating the skill after roughly 30 secs of initial waiting time. Katie in particular can upgrade this skill from Call for Reinforcements II to Call for Reinforcements III after CC, upon which she will grant 15 instead of 10 UP. This ability is incredibly useful early on in any map and Katie herself can be a very decent secondary tank for all but the most dangerous foes if coupled with a healer. Furthermore, she gains the ability to block 3 enemies instead of two after CC. She can be earned by 3-starring her final drill and is incredible to have early in the game! Archers have high damage output against any non-armored foe and they gain an increased range after CC, which allows them to defend an even wider area around them from both ground and aerial enemies. Their relatively low unit cost means you can deploy them very early on any map. Healers gain increased range and healing power after CC. This gives you more diversity in their placement on the field to either cover more allies or to be further away from harm's reach. Witches and Mages gain increased range after CC and both ignore defenses. Witches can slow enemies down and deal good single-target damage, while mages can deal high damage to all foes near the main target albeit slower interval. Note that mages are by far one of the most expensive classes to deploy, and thus cannot be used early on. These two classes can attack aerial enemies as well. Heavy Infantries are defense-oriented units that serve as great tanks against swarms of weaker foes or even powerful bosses. They can block up to 3 enemies at a time and with the highest HP (health) and defense power of all classes, they can take heavy punishment without dying. Upon CC, they usually provide players with an opportunity to dramatically increase their defensive power even further (in addition to attack speed boost). Due to heavy infantries' low damage, they are best coupled with mages and healers. Other Units: Once you have some good units CC'd, it's time to think about optional units. Players are somewhat split on their opinions as to which units are practical or not, but it is generally advised to have at least one of each units aforementioned for different situations. The other optional units are as follows: Rogues serve as a luck-based assassination (instant kill) option and also possess the chance to dodge physical attacks (melee or ranged). They are useful when you encounter a particularly tough foe early on a map, for example an enemy heavy infantry you cannot kill due to UP limitations, their attack power and speed is quite high. However, the luck-based elements of these units make some players avoid them. Valkyries can provide a decent boost to your UP if deployed early enough since they recover one UP for every enemy they personally slay. Valkyries also benefit from lower withdrawal costs instead of the standard 50% UP refund when you withdraw a unit (Valkyries refund 70% and then 80% upon CC). They are fairly good at tanking enemy casters because of their Magic Resistance (MR) and excellent stats. This is especially useful when other options such as Princesses or event units aren't available. Bandits can be used as something in between; they have high health and attack power but possess low defense and are often coupled with a skill that increases their attack power at the cost of decreasing defense. This combination of stats allows them to counter enemy mages (since mages ignore defense anyway) and they can also one-hit kill weaker enemies on high levels, thanks to their incredible attack power. Additionally, all bandits also have an extra passive where they deal double damage against armored units, making them a good early-mid game unit when princesses are too costly to summon. Keep in mind that Rogues, Valkyries and Bandits can only block one foe at a time even after CC. Finally: The units you can obtain may vary but you will in general want two of each ranged types and later two heavy infantries. If you encounter any trouble, the community is always happy to give you advice. And keep this in mind; all ranged units get increased range after CC and that is a great boost! Read through Team Unit Composition article and try to create a balanced team for yourself and your play style. [4] Bronze Units can be useful as well! While bronze units have a level cap of 40 and cannot be CC'd, you might want to spare a few from becoming fodder because they do have their advantages. Since they are easy to obtain, you can reduce their cost easily, allowing for quicker deployment. Bronze Soldiers in particular are incredibly cheap; you can CR them down to a UP cost of only 4! Utilizing them is great in many maps that require rapid deployments at several locations. Bronze archers are vital for many male-only missions as they are the only cheap ranged units available in such situations. As Heavy Infantries are relatively rare early in the game, a bronze heavy infantry will suffice as a secondary tank until you manage to get a better replacement. Bronze mages have the advantage of being significantly cheaper than their higher grade counterparts and thus can be deployed much earlier. [5] There are two male healers in game and you can only get them from shrine or events The male healers that you can get only in shrine and as a drop or completion reward in certain events are very useful for male-only missions, so if you are able to get one of them, do not use him as fodder. [6] Enemies have fixed spawn points If you're not doing well on certain missions, try lasting as long as you can and then memorize or take notes on where the enemies are coming from. So far, enemy spawning is fixed in all maps - this means you can predict with certainty where, when and how many enemies will spawn. Keeping track of this information can save you from a lot of frustration. There are also plenty of Youtube guides posted by players for particularly troublesome maps. Try searching for the mission name if you want this kind of help. [7] Grinding is an essential task in this game Like it or not, grinding is an essential task in this game. Maps that are easy to grind early and give good units for combining include: Pastoral Gate, Mysterious Beast, the Royal Road, Tower Overwatch, and the Wolfpack. Once you are able to easily complete Return to Ruins, that map will be your best grinding place for unit experience for a while as long as you have gold for combining. Castle Retake is an extremely difficult mission for new players, but once you can beat that map, you will unlock Dragon Hunting and Flame Dragon, both of which are excellent grinding places for your Prince's experiences while also providing decent unit experiences without hitting your gold reserves nearly as hard as Return to Ruins. Note that Dragon Hunting only drops a maximum of 4 units instead of the usual 5. This chart lists vital statistics for grinding mission maps. [8] Raising affection Raising affection is a task not to be overlooked since it increases the stats of your units by a large amount. This goes hand in hand with CC, as you can only raise a unit's affection past 50% after CC. A lump sum of stats is awarded at 100% affection and unlocks the second scene. Some units like princesses and certain event units cannot be CC'd but are still able to attain 100% affection. Early in the game, raising affections can be very difficult but become easier once you unlock the Challenge Quest - Low Cost Battle. While some grinding is needed to get that far, units around Level 20 should be adequate. Once you are able to CC your units, try going for Phalanx 2 and farm for affection items there as this map has the potential of dropping two rubies for every successful attempt. You will need high level mages and witches and possibly decent tanks as well to beat it. [9] Daily Missions Once you feel comfortable with your progress, you should consider doing Daily Missions. Generally speaking, the H(hard) mission is the most cost-effective since the drop rates are much higher than in N(normal) and E(easy); however, it is recommended that you CC many of the mentioned units in point #3 before attempting H difficulty. Details are on the Daily Missions page. Most players highly recommend running the Monday and Thursday dailies on the highest difficulty you can manage, but not to focus on the daily missions until your team is at a decent level (around 30). [10] Don't waste spirits You can combine a platinum armor (fodder units with base XP of 1000) earned from the Monday Daily Mission with 3 spirits of the same rarity as the unit you want to combine for a gigantic 8000 XP bonus. Two such combinations are enough to bring a silver unit from Level 1 to Level 50, although it is recommended to use them later in the leveling process (at Level 40 and beyond) on units of higher rarity when it becomes extremely gold-intensive. Consult the XP Chart and table for Combination with Exp. Armors for optimal Spirit/Platinum armor usage. You can also combine excess spirits together with bronze units for hefty XP bonuses as bronze units offer more XP than the iron units you typically obtain from story mission maps. Make sure the spirits are of the same rarity as the unit you want to combine to gain the full multiplicative bonus. Low Cost Battle drops silver spirits while Phalanx 2 drops gold and platinum spirits. Both missions were recommended in point #8 as they are a great source for spirits. Rainbow spirits especially are quite rare, hold onto these until you are certain you want to SU a specific unit. [11] Be mindful of Sacred Crystal (SC) usage If you are already spending a lot of real money on this game, you may skip this part. At first you will be rolling in SC because of the ease of 3-starring the first several story missions. Later on, the flow of SC will slow down to a trickle, with the stamp card giving at best 5 SC per month provided you login everyday, and few events per month granting opportunities to earn some more through 3-starring event maps. Some players advocate for constant re-rolling of your account (typically by just registering another email account) until you are able to summon a black unit from the Shrine. Others advocate for hoarding SC to use only for events or when the Summon Premium Unit in the Shrine is offering a promotional "chance up" for a particular desirable class of units. In either case, don't spend SC until you are absolutely sure about your decision.
|
I read the Readme up there, but...[]
Assuming you read the collapsed "readme" box with a plethora of helpful tips, and STILL can't figure out a team, here's an easy-to-acquire setup to get the ball rolling:
| An example team, comprised entirely of free units from the Daily Revivals and the Trading Post. |
|---|
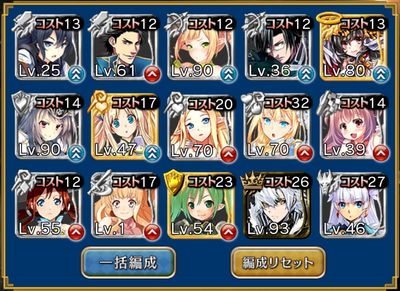  This image is mapped. Click a unit to go to its page. |
| If you didn't guess from the levels, some of these have excellent late-game potential |
Differences Between Nutaku and DMM[]
| Differences |
|---|
|
I'm afraid not. I'll try and list out as many differences as I can remember, since it sounds like we'll be getting quite the influx of players migrating over.
I'm sure I missed at least a couple things, so fire away with any questions you, or anyone else, may have -- I don't mind helping former Nutaku players get up to speed.
|
Black Ticket Picks[]
At Ranks 10 and 25, players will receive a ticket that allows them to select a Black unit from a limited pool. Black is the highest rarity grade, and thus are both incredibly rare and incredibly powerful.
In regards to who to pick, some common choices are as follows:
- UP Generation: Altair
- Damage/Tanking: Dina
- Healing: Rinne, Kikyou, Elyse
- Physical Tanks: Dine, Sarah, Olivier
- Anti-Air: Nanaly
- Cooldown Reduction/Damage: Aisha
- Utility Passive: Towa
Newer players should take advantage of the free Daily Premium Roll for 7 days before deciding who to pick, lest they end up getting duplicates from the free rolls.
Obtaining DMM Points[]
Information on how to purchase/obtain DMM Points for use in the Shop can be found here (Touken Ranbu wikia), here (Kancolle wikia), or here (Free DMM Points overview).